Patricia Moroz's gingerbread, royal icing recipes
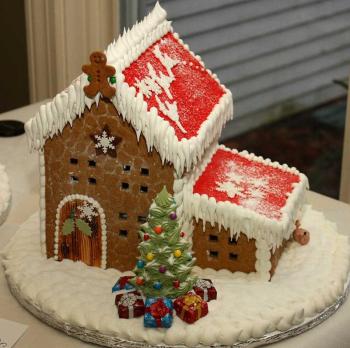
Patricia Moroz of Rockport is owner of Starlight Custom Cakes and specializes in making gingerbread houses in addition to sculpted cakes and specialty cakes. Below are the recipes she uses for gingerbread creations.
Beginner's Gingerbread
(For little fingers, new bakes and others)
Ingredients:
8 ounces unsalted butter (16 T. or 2 sticks), softened
1-1/2 cups packed light brown sugar
1 cup dark molasses (not blackstrap)
6-1/4 cups cake flour
2 tsp. ground cinnamon
1/2 tsp. ground cloves
2 eggs
1 tsp. pure vanilla extract
4 tsp. ground ginger
1 tsp. baking soda
1/2 tsp. salt
Directions:
1. In a mixer fitted with a paddle attachment, cream the butter until smooth. Add the sugar and mix until light and fluffy. Add the eggs, one at a time, until incorporated. Add the molasses and vanilla and mix.
2. Sift together the flour, ginger, cinnamon, baking soda, cloves and salt. Working in batches, and mixing after each addition just until combined, add the flour mixture to the butter-sugar mixture. Shape the dough into a thick disk, wrap in waxed paper, and refrigerate one to two hours.
3. Preheat oven to 350 F. Grease two cookie sheets and line with parchment paper.
4. On a lightly floured surface, divide the dough in half and roll each piece out into a large 1/2-inch-thick sheet. Transfer the dough sheets to the sheet pans; then cut out the required shapes with your cutters.
5. Bake until stiff and toasty, about 10-15 minutes. Let cool completely before removing from pan and beginning to assemble your gingerbread house with royal icing (recipe below).
Royal Icing
Ingredients:
2 pounds confectioner's sugar
6 level T. meringue powder (buy where Wilton products are sold)
6 T. warm water
Mix all ingredients in mixer for at least 10-15 minutes. The longer you mix, the whiter it gets. Icing should be ready when it holds a peak.
Notes:
• The trick to royal icing is getting the consistency right for what you are doing. If you are gluing house pieces together, make it about the same consistency as peanut butter. If you want to drip icicles from the roof edges, make it a bit softer, but not so soft it drips off.
• Once you place icing into a decorating bag, if it hurts your hand to squeeze out the icing, you have made it too stiff. Add a few drops of water and remix.
• If you squeeze out icing on a piece of gingerbread and it begins to slide, or if your decoration starts to slide, the icing is too soft. Just add a little more confectioner's sugar.
• If royal icing is not mixed long enough, it will have an eggshell color instead of pure white.
• Royal icing cannot be over-mixed.
• Royal icing will dry very quickly. Be sure to place a wet towel over the bowl to cover the portion you are not using.
• Meringue powder can be purchased in the cake decoration section of department stores, at craft stores and baking supply stores. Meringue powder helps keep the icing hard once dry. Lower cost powders do not produce bright white icing.
Gingerbread House Dough
For houses and structures
Wet Ingredients:
3/4 cup vegetable shortening
1/2 cup molasses
1/2 cup corn syrup (light or dark)
5 T. warm water
Dry Ingredients:
5 cups all-purpose flour
1 tsp. ground cinnamon
1 T. ground ginger
1/2 tsp. salt
3/4 cup granulated sugar
Before you start:
It is important to note that because this dough is a very sturdy dough, you will want to use a sturdy tabletop mixer. A hand mixer or small lightweight mixer will not be strong enough to handle mixing this recipe.
Directions:
1. Combine the Wet ingredients in a mixer bowl, fitted with paddle attachment, and mix well for several minutes.
2. Combine the Dry ingredients in a separate bowl.
3. Change the paddle to a dough hook, this is very important.
4. Add a few cups of dry ingredients to the wet mixture. Mix until all ingredients have been combined using the dough hook. Add small amounts of water (a T. at a time) to dough mix, as needed. The dough should have the consistency of Play Dough. You should be able to roll a ball of the dough in your hands without it sticking or without it being so dry that it is cracking. If you can't easily roll out the cracks, then your dough is too dry and you need to add some water. If you add a little too much water, then you will need to use extra flour on your rolling pin and hands when rolling it out.
5. Once mixed, place dough in a plastic bag and let sit for an hour before rolling out to use.
6. When dough is placed in a plastic bad, you should be able to knead it a bit, and it should be smooth with creases. It should not have cracks from being too dry.
7. Roll dough onto parchment paper cut to fit the size of your baking pans and use a template of the house or shapes you wish to create. Remove excess dough from the parchment paper instead of lifting the gingerbread and transferring to a baking sheet. Cut windows, doors or any openings with a knife before putting the house pieces in the oven to bake.
8. Bake pieces at 325 F until edges are light brown. Even if the pieces are a little underdone, they will dry hard and usable. Set aside until cool and ready for assembly and decorating.
Making the house: A three-part process
Part 1: Bake the houses on one day.
Bake on one day and apply royal icing to the back sides of any larger pieces and allow to dry for at least 24 hours.
Part 2: Mix royal icing and glue house parts together.
Build all the walls first using soup cans or anything around the house to keep them in place until they dry. Wait several hours before gluing rooftops in place. Allow to dry completely for 24 hours, or more, if possible.
Part 3: Decorating!
Many people who attempt to make gingerbread houses end up being frustrated because they try to bake, glue and decorate all in one day. Trying to decorate a house while it is still drying causes the house to fall apart. House pieces can be made months in advance, as can gluing the houses together. After decorating the house, the houses can be dusted with some "snow" for a wintery look. Simply place a bit of powdered sugar into a fine sifter and test on a sheet of paper to be sure it is fine enough for the look you want to achieve. Edible white hologram dust can also be sprinkled on a house as a last step. It gives a diamond sparkle to the houses when light is reflected off them.
Special Notes:
• Coloring dough: Add cake icing coloring paste to the wet ingredients, and mix in well before adding the dry ingredients.
• Batter uses: This batter is intended primarily for houses that will be displayed through the holidays and these houses, if stored properly in a dry and cool place, can be kept for several years.
• Cutting dough: When cutting windows or designs out of this dough, this particular recipe will only slightly rise so that your designs will stay clear and not lose their shape. It is edible, but because this batter gets so hard, it is best for building houses and structures that will be kept for display.
• Rolling tip: It is a great idea to use a rolling pin with the baking rubber bands (inexpensive purchase) that maintains the thickness evenly, which will make your pieces stronger.
• Icing tip: Icing can be applied as soon as the pieces have completely cooled, but let it dry overnight before building the actual structure.
• Humidity: Remember, this is just a cookie. It is best to keep the parts in a cool and dry area. If the pieces are placed in an area with high humidity, the pieces will get soft just like a cookie that has been left out would.
• Flour on the dough: No problem. Don't worry about flour on the dough after it has baked. To wipe off, use a slightly damp cloth and brush lightly.
Event Date
Address
United States


